Asp.Net Core has a set of action results which are intended to facilitate the creation and formatting of response data. Without a well formed correct response, our application cannot work correctly and efficiently. Therefore action results and as a whole mechanisms that are responsible for generating the response are an important part of an Asp.Net Core application. Knowing and using them correctly not only contribute to a more readable controller that states its intention clearly, but also it can reduce a lot of codes that are superfluous and are not needed to be written.
In this post I’m going to explain how Asp.Net Core action results works and what kind of response they return to the client. Also I’m going to discuss when and why to use them and how you can create you own custom action results. Also I’m going to introduce some ideas and opinions about correct usage and best practices that might be of benefit.
Different categories of action result
I categorize the action results to five sections, these sections are mostly based on usage:
Miscellaneous: These are action results that are stand on their own or are too general
Security: These are action results that are related to security
Redirect: These are action results that are related to different kinds of redirection
Web API: These are action results that are most likely used in API controllers, but some of them can be used everywhere
Files: These are action results that are related to files
Here is a diagram describing the actions results’ inheritance hierarchy:

I could go with explaining the action results in accordance with this picture, but I thought categorizing it based on usability helps with remembering and explanation. Also because some of their characteristics can be the same.
Quick note on returning action results
When we want to render a view, we simply use return View("ViewName", Model). But what the framework actually does for us behind the scene is that it news up an instance of ViewResult, fill its property with the values we provided, or the values that should be set on the controller level. It makes our job simpler by doing some plumbing work for us, lets see what the framework does for us behind the scene:
|
public virtual ViewResult View(string viewName, object model) |
|
{ |
|
if (model != null) |
|
this.ViewData.Model = model; |
|
ViewResult viewResult = new ViewResult(); |
|
viewResult.ViewName = viewName; |
|
ViewDataDictionary viewData = this.ViewData; |
|
viewResult.ViewData = viewData; |
|
ITempDataDictionary tempData = this.TempData; |
|
viewResult.TempData = tempData; |
|
return viewResult; |
|
} |
As you can see if the framework didn’t do this, we needed to do a lot of plumbing work and our controller would have become harder to read. By the way what the framework does here is actually called Command Pattern.
So this basically means whenever we return Json(data), we could also return new JsonResult(data), and it’s true for all types of return result, some of them have less setup work to do, some of them have more. other thing to note is that some of these convenience methods are in abstract class Controller which we inherit from, and some of them are in ControllerBase. I think it’s very useful to know what the framework does for you under the hood, because in some circumstances it can make things more flexible or simpler.
Miscellaneous action results
|
public class Person |
|
{ |
|
public string FirstName { get; set; } |
|
public string LastName { get; set; } |
|
} |
|
|
|
public class HomeController : Controller |
|
{ |
|
public IActionResult IndexWithId(int id) |
|
{ |
|
return View(); |
|
} |
|
|
|
public ActionResult IndexActionResult() |
|
{ |
|
return View(“Index“); |
|
} |
|
|
|
public ViewResult IndexViewResult() |
|
{ |
|
return View(); |
|
} |
|
|
|
public JsonResult JsonActionResult() |
|
{ |
|
var data = new { Name = “Alex“, LastName = “DeLarge“ }; |
|
|
|
return Json(data); |
|
} |
|
|
|
public PartialViewResult PartialViewActionResult() |
|
{ |
|
var model = new List<int> { 2, 3 }; |
|
|
|
return PartialView(“_PartialViewActionResult“, model); |
|
} |
|
|
|
//writes the result of component to response, notice that you can directly call it in a controller |
|
//IViewComponentResult should be returned from a Class that inherent form ViewComponent |
|
public ViewComponentResult HomeSliderComponent() |
|
{ |
|
return ViewComponent(“HomeSlider“, new { id = 4 }); |
|
} |
|
|
|
//returns 200 with the content and specified media type for the content |
|
public ContentResult ContentActionResult() |
|
{ |
|
return Content(“{Name: ‘Hamid’}, {Name: ‘Stanley’}“, new MediaTypeHeaderValue(“application/json“)); |
|
} |
|
|
|
//returns 200 OK which is empty |
|
public EmptyResult EmptyActionResult() |
|
{ |
|
return new EmptyResult(); |
|
} |
|
|
|
public Person PocoResult() |
|
{ |
|
return new Person { FirstName = “Major“, LastName = “Bob“ }; |
|
} |
|
|
|
public List<Person> GetAllPersons() |
|
{ |
|
return new List<Person> { new Person { FirstName = “Alex“, LastName = “DeLarge“ }, new Person { FirstName = “Major“, LastName = “Bob“ } }; |
|
} |
|
|
|
public int IntResult() |
|
{ |
|
return 2; |
|
} |
|
|
|
public string StringResult() |
|
{ |
|
return “Major Bob ?“; |
|
} |
|
|
|
[NonAction] |
|
public Person YouShallNotPass() |
|
{ |
|
return new Person { FirstName = “James“, LastName = “Gandolfini“ }; |
|
} |
|
} |
IActionResult and ActionResult
IActionResult and ActionResult work as a container for other action results, in that IActionResult is an interface and ActionResult is an abstract class that other action results inherit from. So they can’t be newed up and returned like other action results. IActionResult and ActionResult have not much of a different from usability perspective, but since IActionResult is the intended contract for action results, it’s better to use it as opposed to ActionResult. IActionResult/ActionResult should be used to give us more flexibility, like when we need to return different type of response based on user interaction.
For example if something not found we return NotFoundResult, but if it was found we return it as part of a ViewResult. We can also use it to implement graceful degradation, for example if JavaScript was enabled we return a JsonResult but if it wasn’t we return ViewResult. We find this out by setting a flag of some kind to true form JavaScript if it was enabled, like I’ve explained in this post.
ViewResult
ViewResult is intended to render a view to response, we use it when we want to render a simple .cshtml view for example.
JsonResult
JsonResult is intended to return JSON-formatted data, it returns JSON regardless of what format is requested through Accept header. There is no content negotiation happen when we use JsonResult. Content negotiation is the process of figuring out what type of data browser requested through its Http request Accept header. For example this is an accept header that request content of type HTML: Accept: application/xml, */*; q=0.01, with action results of type JsonResult no content negotiation takes place. Which means server ignores the user requested type and return JSON, I explain content negotiation in more detail in subsequent section.
PartialViewResult
PartialView are essential when it comes to loading a part of page through AJAX, they return raw rendered HTML. Here I try to explain a scenario that I might want to use PartialViews:
I have a page that submit a Product, I have a main page for it. Now I want to add different brand of the same product with some info about it, I have a button to add more brand of products. I can either submit the product and add brand to it using a normal view, or I can add a button and a modal containing the fields needed for submitting new brands.
But how should I do it? place the needed HTML on the main page? What if there was a different model for the data involved with it? Or some kind of calculation was involved? Wther way is to do all the calculation from JavaScript side but that would be too verbose. Best way is to use an action result of type PartialViewResult, do the stuff I need to do there, return the HTML and attach the HTML to the main page through JavaScript.
ViewComponentResult
Usually we use view component by calling Component.InvokeAsync in the view, but can we use the returned HTML form a view component directly? Maybe we want to reuse our business logic or refresh our the HTML part of the page that are loaded with view component, can we do that? YES! we can do that with ViewComponentResult, as you can see with the code excerpt above, the HomeSliderComponent is a view component action that we can directly call and get HTML, and do something like what has asked in this question.
ContentResult
The default return type of a ContentResult is string, but it’s not limited to string. We can return any type of response by specifying a MIME type, in the code excerpt above I’ve returned a content of type application/json.
EmptyResult
I use EmptyResult when I have some kind of command, like delete, update, create and I don’t want to return anything. According to CQS principle commands shouldn’t return anything. EmptyResult execute our command and return 200 status code. There is one other kind of action result that return null but it doesn’t return 200 HTTP status code, but 204. It’s called NoContentResult, but we might want to use that when we have a web api. I explain that in detail in subsequent section.
Result of type POCO!
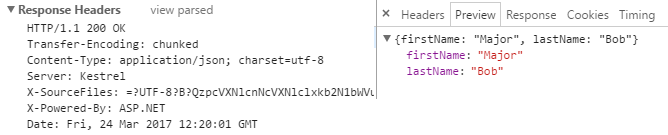
If we want to return a POCO class for an action, we can. As you can see in the code above the PocoResult action returns an object of type Person and when accessed, we get a nicely formatted JSON.
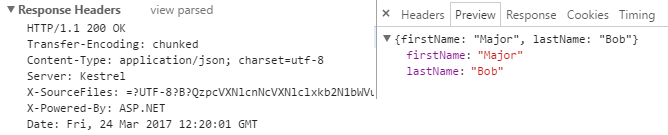
That’s because the framework automatically creates an ObjectResult wrapper for you, and the default format of serialization in MVC is JSON. You can also have an action of type generic list of Person, like with the GetAllPersons action and the framework takes care of serialization for you.
Primitive Types Result
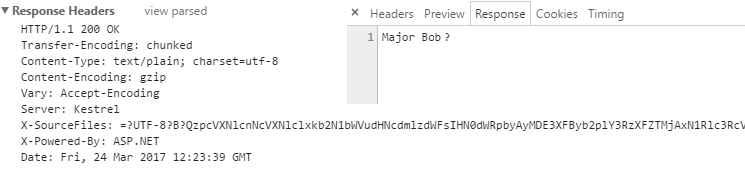
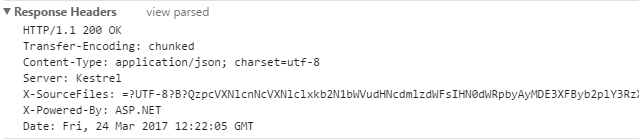
You can also return string or int or any other kind of primitive types and the framework tries its best to convert it to a response that is pertinent to the current type. Here what happens when you return a string in StringResult:
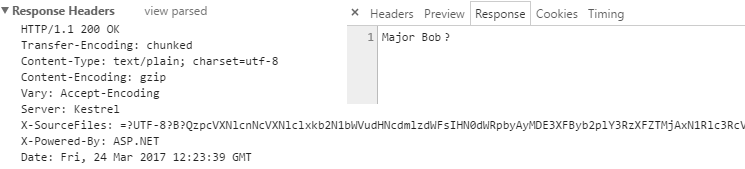
In this case we get a response with content type of text/plain, but that’s not true for other types, for example here is what you get when you return int in action IntResult:
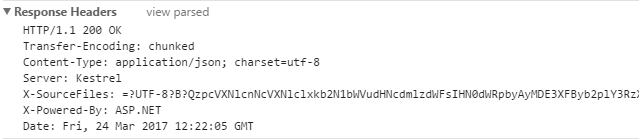
Here we see that result is converted to JSON, hmm.
NonAction Attribute
If you want an action to not be accessed from outside, and be public too, you can use [NonAction] attribute. By decorating an action by [NonAction], you’ll get a 404.
Security related action results
|
//sign in the user with its claim through returning SignInResult |
|
public SignInResult SignInActionResult() |
|
{ |
|
const string Issuer = “https://gov.uk“; |
|
|
|
var claims = new List<Claim> |
|
{ |
|
new Claim(ClaimTypes.Name, “Andrew“, ClaimValueTypes.String, Issuer), |
|
new Claim(ClaimTypes.Surname, “Lock“, ClaimValueTypes.String, Issuer), |
|
new Claim(ClaimTypes.Country, “UK“, ClaimValueTypes.String, Issuer), |
|
new Claim(“ChildhoodHero“, “Ronnie James Dio“, ClaimValueTypes.String) |
|
}; |
|
|
|
var userIdentity = new ClaimsIdentity(claims, “Passport“); |
|
|
|
var userPrincipal = new ClaimsPrincipal(userIdentity); |
|
|
|
var authenticationProperties = new AuthenticationProperties |
|
{ |
|
ExpiresUtc = DateTime.UtcNow.AddMinutes(20), |
|
IsPersistent = false, |
|
AllowRefresh = false, |
|
RedirectUri = “/Home/Index“ |
|
}; |
|
|
|
return SignIn(userPrincipal, authenticationProperties, “Cookie“); |
|
} |
|
|
|
//sign in the user with its claim through authentication manager |
|
public async Task SignInResultAsync() |
|
{ |
|
const string Issuer = “https://gov.uk“; |
|
|
|
var claims = new List<Claim> |
|
{ |
|
new Claim(ClaimTypes.Name, “Andrew“, ClaimValueTypes.String, Issuer), |
|
new Claim(ClaimTypes.Surname, “Lock“, ClaimValueTypes.String, Issuer), |
|
new Claim(ClaimTypes.Country, “UK“, ClaimValueTypes.String, Issuer), |
|
new Claim(“ChildhoodHero“, “Ronnie James Dio“, ClaimValueTypes.String) |
|
}; |
|
|
|
var userIdentity = new ClaimsIdentity(claims, “Passport“); |
|
|
|
var userPrincipal = new ClaimsPrincipal(userIdentity); |
|
|
|
var authenticationProperties = new AuthenticationProperties |
|
{ |
|
ExpiresUtc = DateTime.UtcNow.AddMinutes(20), |
|
IsPersistent = false, |
|
AllowRefresh = false, |
|
RedirectUri = “/Home/Index“ |
|
}; |
|
|
|
await HttpContext.Authentication.SignInAsync(“Cookie“, userPrincipal, authenticationProperties); |
|
} |
|
|
|
//sign out the user with its claim through returning SignOutResult |
|
public SignOutResult SignOutActionResult() |
|
{ |
|
var authenticationProperties = new AuthenticationProperties |
|
{ |
|
ExpiresUtc = DateTime.UtcNow.AddMinutes(20), |
|
IsPersistent = false, |
|
AllowRefresh = false, |
|
RedirectUri = “/Index“ |
|
}; |
|
|
|
return SignOut(authenticationProperties, “Cookie“); |
|
} |
|
|
|
//sign out the user with its claim through returning authentication manager |
|
public async Task SignOutResultAsync() |
|
{ |
|
var authenticationProperties = new AuthenticationProperties |
|
{ |
|
ExpiresUtc = DateTime.UtcNow.AddMinutes(20), |
|
IsPersistent = false, |
|
AllowRefresh = false, |
|
RedirectUri = “/Index“ |
|
}; |
|
|
|
await HttpContext.Authentication.SignOutAsync(“Cookie“, authenticationProperties); |
|
} |
|
|
|
//returns 403 Forbidden status code and redirect the user to the path specified when we setup AccessDeniedPath in cookie authentication |
|
//but do it through the AuthenticationManager Class |
|
//https://httpstatuses.com/403 |
|
public async Task ForbidAsyncResult() |
|
{ |
|
//var props = new AuthenticationProperties |
|
//{ |
|
// RedirectUri = “/Home/About” |
|
//}; |
|
|
|
await HttpContext.Authentication.ForbidAsync(); |
|
} |
|
|
|
//returns 403 Forbidden status code and redirect the user to the path specified when we setup AccessDeniedPath in cookie authentication |
|
public ForbidResult ForbidActionResult() |
|
{ |
|
var props = new AuthenticationProperties |
|
{ |
|
RedirectUri = “/Home/About“ |
|
}; |
|
var something = new ForbidResult(); |
|
//return Forbid(); |
|
return Forbid(props); |
|
} |
|
|
|
//returns the 401 Unauthorized response and redirect the user to the path specified when we setup AccessDeniedPath in cookie authentication |
|
//but do it through the AuthenticationManager Class |
|
//https://httpstatuses.com/401 |
|
public async Task ChallengeAsyncResult() |
|
{ |
|
//var props = new AuthenticationProperties |
|
//{ |
|
// RedirectUri = “/Home/About” |
|
//}; |
|
|
|
await HttpContext.Authentication.ChallengeAsync(); |
|
} |
|
|
|
//returns the 401 Unauthorized response and redirect the user to the path specified when we setup AccessDeniedPath in cookie authentication |
|
public ChallengeResult ChallengeActionResult() |
|
{ |
|
var props = new AuthenticationProperties |
|
{ |
|
RedirectUri = “/Home/About“ |
|
}; |
|
|
|
return Challenge(props); |
|
} |
|
|
|
//returns a response with 401 response code |
|
public UnauthorizedResult UnauthorizedActionResult() |
|
{ |
|
return Unauthorized(); |
|
} |
SignInResult
SignInResult will sign in the user based on provided mechanism. As you can see in the code above, the SignInActionResult creates a ClaimsPrincipal along with an identity called passport and the claims needed for that identity. Then it passes the claim principal to the SignIn method of the controller. Currently we use cookie to sign the user in.
Also note that returning SignInResult is the same as calling HttpContext.Authentication.SignInAsync, on AuthenticationManager class as you can see happened in the method SignInResultAsync. SignInResult internally calls the SignInAsync for you in its ExecuteResultAsync method. The effect of returning a SignInResult or calling the SignInAsync is the same but the SignInResult is more readable in the context of a controller in my opinion. I use SignInAsync outside controllers if I wanted to sign the user in. By the way if you want to know more about the authentication process in asp.net core Andrew Lock has a fantastic introductory article on it.
SignOutResult
This one is the same as SignInResult with the difference that it sign the user out. As you can see in the SignOutActionResult method, SignOut method takes an authentication scheme which determine from what kind of authentication the user should get signed out. You can also call the HttpContext.Authentication.SignOutAsync if you like as I did in the SignOutResultAsync method.
ForbidResult
We use ForbidResult when we want to refuse request to a particular resource. it returns 403 status code to response and redirect us to the path specified in cookie authentication setup through the AccessDeniedPath property. From what I understood from its HTTP specification, it should be used to allow access if the user had the correct authorization credentials, and completely refuse it if user hadn’t.
By this I mean we don’t redirect the user to a login page. We might even show a 404 page for more security and don’t let the unauthorized user even know that such a resource exist and needs the correct credentials. It’s like saying what are you doing here with this credential dude? You shouldn’t event be here! ForbidResult calls HttpContext.Authentication.ForbidAsync internally, so we can basically call the FordbidAsync method of AuthenticationManager directly like in ForbidAsyncResult method as you can see in the code excerpt above.
ChallengeResult
We use ChallengeResult when we need to tell the user that his authentication credential wasn’t valid or not even present. Then redirect the user to a login page which is our way of challenging the user so to speak. With doing so we get 401 Unauthorized status code in our response and get redirected to the path specified in cookie authentication setup through the AccessDeniedPath property. Like other security related results you can also call HttpContext.Authentication.ChallengeAsync as in ChallengeAsyncResult directly.
UnauthorizedResult
UnauthorizedResult returns 401 status code, its difference with ChallengeResult is that it just returns an status code and doesn’t do anything else. In contrast with its counterpart that has many options for redirecting the user and options related to asp.net core identity.
Redirect related action results
|
//redirect to specified string URL with permanent 301 property set to false |
|
public RedirectResult RedirectActionResult() |
|
{ |
|
//return Redirect(“/”); |
|
return Redirect(“http://localhost:12060/Home/Index“); |
|
} |
|
|
|
//redirect to specified string URL with permanent 301 property set to true |
|
public RedirectResult RedirectPermanentActionResult() |
|
{ |
|
return RedirectPermanent(“/“); |
|
return RedirectPermanent(“http://localhost:12060/Home/Index“); |
|
} |
|
|
|
//redirect to specified action with permanent 301 property set to false |
|
public RedirectToActionResult RedirectToActionActionResult() |
|
{ |
|
return RedirectToAction(“Index“); |
|
} |
|
|
|
//redirect to specified action with permanent 301 property set to true |
|
public RedirectToActionResult RedirectToActionPermanentActionResult() |
|
{ |
|
return RedirectToActionPermanent(“Index“); |
|
} |
|
|
|
//redirect to specified route by taking a route dictionary either as a type or as an anonymous type with permanent 301 property set to false |
|
public RedirectToRouteResult RedirectToRouteActionResult() |
|
{ |
|
var routeValue = new RouteValueDictionary(new { action = “Index“, controller = “Home“, area = ““ }); |
|
var routeValue2 = new { action = “Index“, controller = “Home“, area = ““ }; |
|
|
|
return RedirectToRoute(routeValue); |
|
} |
|
|
|
//redirect to specified route by taking a route dictionary either as a type or as an anonymous type with permanent 301 property set to true |
|
public RedirectToRouteResult RedirectToRoutePermanentActionResult() |
|
{ |
|
var routeValue = new RouteValueDictionary(new { action = “Index“, controller = “Home“, area = ““ }); |
|
var routeValue2 = new { action = “Index“, controller = “Home“, area = ““ }; |
|
|
|
return RedirectToRoutePermanent(routeValue2); |
|
} |
|
|
|
//redirect to specified URL is it’s local URL (also relative), if not it will throws an exception, permanent 301 property set to false |
|
public LocalRedirectResult LocalRedirectActionResult() |
|
{ |
|
var IsHomeIndexLocal = Url.IsLocalUrl(“/Home/Index“); |
|
var isRootLocal = Url.IsLocalUrl(“/“); |
|
|
|
//throws InvalidOperationException: The supplied URL is not local. Url must be relative |
|
var isAbsoluteUrlLocal = Url.IsLocalUrl(“http://localhost:12059/Home/Index“); |
|
|
|
return LocalRedirect(“/Home/Index“); |
|
} |
|
|
|
//redirect to specified URL is it’s local URL (also relative), if not it will throws an exception, permanent 301 property set to true |
|
public LocalRedirectResult LocalRedirectPermanentActionResult() |
|
{ |
|
var IsHomeIndexLocal = Url.IsLocalUrl(“/Home/Index“); |
|
var isRootLocal = Url.IsLocalUrl(“/“); |
|
|
|
//throws InvalidOperationException: The supplied URL is not local. Url must be relative |
|
var isAbsoluteUrlLocal = Url.IsLocalUrl(“http://localhost:12059/Home/Index“); |
|
|
|
return LocalRedirectPermanent(“/Home/Index“); |
|
} |
There are four types of action results that are related to redirect. With each one you can either return normal redirect, or permanent. The the return method related to permanent ones are suffixed with Permanent keyword. You can also return these results with their Permanent property set to true. These action results are:
- RedirectResult
- RedirectToActionResult
- RedirectToRouteResult
- LocalRedirectResult
In subsequent section I’m going to explain each one of them and when to use them.
RedirectResult
RedirectResult will redirect us to the provided URL, it doesn’t matter if the URL is relative or absolute, it just redirect, very simple. Other thing to note is that it can redirect us temporarily which we’ll get 302 status code or redirect us permanently which we’ll get 301 status code. If we call the Redirect method, it redirect us temporarily.
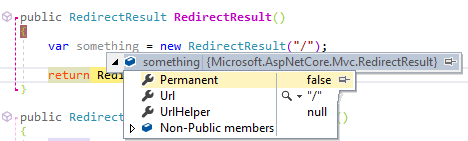
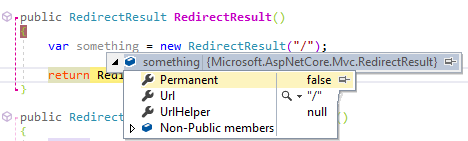
if we call the RedirectPermanent method, it redirect us permanently. Also as I explained in previous section we don’t need to use these methods to redirect permanently or temporarily, we can just new up an instance of RedirectResult with its Permanent property set to true or false and return that instead, like this:
return new RedirectResult("/") {Permanent = true};
RedirectToActionResult
RedirectToActionResult can redirect us to an action. It takes in action name, controller name, and route value, like the previous one. It can redirect us temporarily(RedirectToAction method) or permanently(RedirectToActionPermanent method). By using it and not using a pure string to specify URL, we have the advantage of inspecting the addresses easily as opposed to parsing string.
RedirectToRouteResult
RedirectToRouteResult should be used when we want to redirect to a route, it takes a route name, route value and redirect us to that route with the route values provided. It can also redirect us permanently or temporarily by setting the Permanent property to true or false or by using the controller base methods RedirectToRoute/RedirectToRoutePermanent. Like previous method it is also a better option than RedirectResult because we don’t have to parse route values which are string or assume anything if we wanted to unit test the action for example.
LocalRedirectResult
We should use LocalRedirectResult if we want to make sure that the redirects that happens in some context are local to our site. By doing that we make ourselves immune to open redirect attacks. This action result type takes a string for URL needed for redirect, and a bool flag to tell it if it’s permanent. Under the hood it checks the URL with Url.IsLocalUrl("URL") method to see if it’s local. If it was it redirect us to the address, but if it wasn’t it’ll throws an InvalidOperationException. One other caveat is that if you pass a local URL with an absolute address like this, http://localhost:12059/Home/Index, you’ll get an exception. That’s because the IsLocalUrl method consider URL like this to not be local, so you must always pass a relative URL in.
Web API related action results
In this section I’m going to explain services that might be used in an API contoller, I know some of them might be used everywhere, I just did it to categorize them.
|
//returns and empty 400 response |
|
public BadRequestResult BadRequestActionResult() |
|
{ |
|
return BadRequest(); |
|
} |
|
|
|
//returns 400 with an object containing error detail as object or as Model State Dictionary |
|
public BadRequestObjectResult BadRequestObjectActionResult() |
|
{ |
|
var modelState = new ModelStateDictionary(); |
|
modelState.AddModelError(“Name“, “Name is required.“); |
|
return BadRequest(modelState); |
|
} |
|
|
|
//returns and empty 404 response |
|
public NotFoundResult NotFoundActionResult() |
|
{ |
|
return NotFound(); |
|
} |
|
|
|
//returns 404 with an object containing pertinent info |
|
public NotFoundObjectResult NotFoundObjectActionResult() |
|
{ |
|
return NotFound(new { Id = 2, error = “There was no customer with an id of 2.“ }); |
|
} |
|
|
|
//a response with an object but a null status code |
|
public ObjectResult ObjectActionResult() |
|
{ |
|
return new ObjectResult(new { Name = “TomDickHarry“ }); |
|
} |
|
|
|
//200 with an object if formatting succed |
|
public OkObjectResult OkObjectActionResult() |
|
{ |
|
return new OkObjectResult(new { Name = “TomDickHarry“ }); |
|
} |
|
|
|
//200 with an object if formatting succed |
|
public OkObjectResult OkWithObjectActionResult() |
|
{ |
|
return Ok(new { Name = “TomDickHarry“ }); |
|
} |
|
|
|
// empty 200 without object and formatting |
|
public OkResult OkEmptyWithoutObject() |
|
{ |
|
return Ok(); |
|
} |
|
|
|
//returns 204 no content status code response |
|
//https://httpstatuses.com/204 |
|
public NoContentResult NoContentActionResult() |
|
{ |
|
return NoContent(); |
|
} |
|
|
|
//returns a response with specified status code |
|
public StatusCodeResult StatusCodeActionResult() |
|
{ |
|
return StatusCode(404); |
|
} |
|
|
|
//returns a response with specified status code along with an object |
|
public ObjectResult StatusCodeWithObject() |
|
{ |
|
return StatusCode(404, new { Name = “TomDickHarry“ }); |
|
} |
|
|
|
//return 201 created status code along with the path of the created resource and the actual object |
|
public CreatedResult CreatedActionResult() |
|
{ |
|
return Created(new Uri(“/Home/Index“, UriKind.Relative), new { Name = “Hamid“ }); |
|
} |
|
|
|
//return 201 created status code along with the controller, action, route values and the actual object that is created |
|
public CreatedAtActionResult CreatedAtActionActionResult() |
|
{ |
|
return CreatedAtAction(“IndexWithId“, “Home“, new { id = 2, area = ““ }, new { Name = “Hamid“ }); |
|
} |
|
|
|
//return 201 created status code along with the route name, route value, and the actual object that is created |
|
public CreatedAtRouteResult CreatedAtRouteActionResult() |
|
{ |
|
return CreatedAtRoute(“default“, new { Id = 2, area = ““ }, new { Name = “Hamid“ }); |
|
} |
|
|
|
//return 202 accepted which means info in accepted for processing, and you can return a Uri for more info about processing and an object containing pertinent data |
|
public AcceptedResult AcceptedActionResult() |
|
{ |
|
return Accepted(new Uri(“/Home/Index“, UriKind.Relative), new { Name = “Hamid“ }); |
|
} |
|
|
|
//return 202 accepted which means info in accepted for processing, and you can return controller and action name along with route values |
|
//for more info about processing and an object containing pertinent data |
|
public AcceptedAtActionResult AcceptedAtActionActionResult() |
|
{ |
|
return AcceptedAtAction(“IndexWithId“, “Home“, new { Id = 2, area = ““ }, new { Name = “Hamid“ }); |
|
} |
|
|
|
//return 202 accepted which means info in accepted for processing, and you can return route name along with route values |
|
//for more info about processing and an object containing pertinent data |
|
public AcceptedAtRouteResult AcceptedAtRouteActionResult() |
|
{ |
|
return AcceptedAtRoute(“default“, new { Id = 2, area = ““ }, new { Name = “Hamid“ }); |
|
} |
|
|
|
//returns UnsupportedMediaType (415) response |
|
public UnsupportedMediaTypeResult UnsupportedMediaTypeActionResult() |
|
{ |
|
return new UnsupportedMediaTypeResult(); |
|
} |
BadRequestResult
We use this action result to indicate a bad request, it doesn’t take any argument, it just return a 400 status code.
BadRequestObjectResult
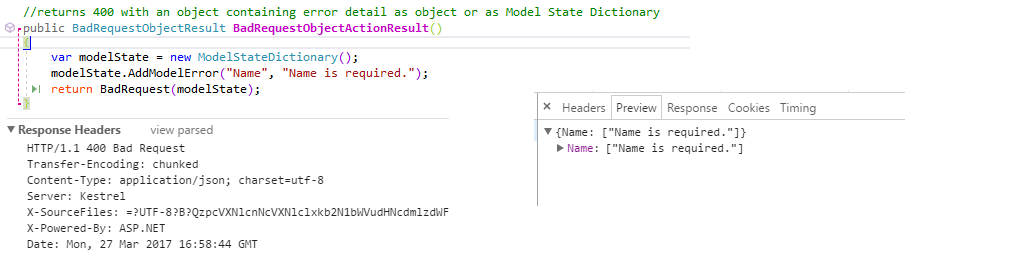
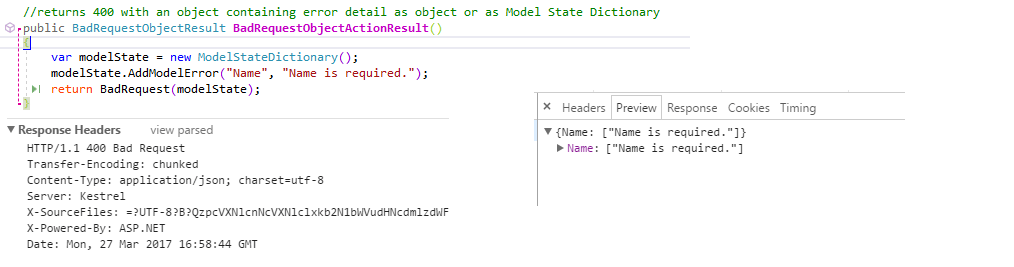
It is the same as BadRequestResult, with the difference that it can pass an object or a ModelStateDictionary containing the details regarding the error, as you see in the picture below:
NotFoundResult
This one is simple, it returns a 404 status code to response.
NotFoundObjectResult
The same as NotFoundResult, with the different that you can pass an object with the 404 response.
ObjectResult
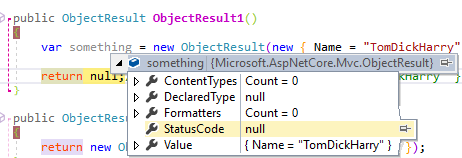
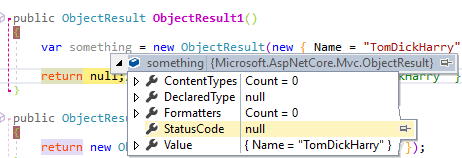
ObjectResult is the super type of: CreatedAtActionResult, CreatedAtRouteResult, CreatedResult, BadRequestObjectResult, NotFoundObjectResult, OkObjectResult, AcceptedResult, AcceptedAtActionResult, AcceptedAtRouteResult. ObjectResult primary role is content negotiation, if you dig deep, it has some variation of method called SelectFormatter on its ObjectResultExecutor. You can return an object with it, and it formats the response based on what user is requested in the Accept header, if the header didn’t exist, it returns the default format configured for the app. It’s important to note that if the request is issued through a browser, the Accept header will be ignored, unless we set the RespectBrowserAcceptHeader to true when we configure the MVC options in Startup.cs. Also it doesn’t set the status code, which cause the status code to be null.
OkObjectResult
OkObjectResult is like ObjectResult, it does the formatting and content negotiation, the only difference is that it returns 200 status code, as opposed to ObjectResult that returns null status code.
OkResult
OkResult return 200 status code, without any related object.
NoContentResult
The action result returns 204 status code. It’s different from EmptyResult in that EmptyResult returns an empty 200 status code, but NoContentResult returns 204. Use EmptyResult in normal controllers and NoContentResult in API controllers.
StatusCodeResult
StatusCodeResult accept an status code number and set that status code for the current request. One thing to point is that you can return an ObjectResult with and status code and object. There is a method on ControllerBase called StatusCode(404, new { Name = "TomDickHarry" }), which can take a status code and an object and return an ObjectResult.
CreatedResult
CreatedResult returns 201 status code along with a URI to the created resource. You should use it when you creating a resource, and after creation you can pass the URI of the created resource and that in turn set the Location header field of the response.
CreatedAtActionResult
Almost the same as CreatedResult, it returns a 201 status code. With the difference that it takes a controller, action, route value, and the object that is created, as opposed to CreatedResult that only takes a URI and an object.
CreatedAtRouteResult
Almost the same as CreatedResult, with the difference that it takes a route name and route value, instead of URI.
AcceptedResult
AcceptedResult returns a 202 status code, indicating that the request is successfully accepted for processing, but it might or might not acted upon. Which in this case we should redirect the user to a location that provide some kind of monitor on the current state of the process, for this purpose we pass a URI.
AcceptedAtActionResult
Almost the same as AcceptedResult with the difference that it takes a controller, action, route value, and an object instead of URI.
AcceptedAtRouteResult
Almost the same as AcceptedResult with the difference that it takes a route name and route value instead of URI.
UnsupportedMediaTypeResult
This action result returns 415 status code, which means server cannot continue to process the request with the given payload. It doing this by inspecting the Content-Type or Content-Encoding of the current request or inspecting the incoming data directly.
File related action results
|
//parent of the file related results, you can return any of the FileContentResult, FileStreamResult, VirtualFileResult, PhysicalFileResult to it |
|
public FileResult FileActionResult() |
|
{ |
|
var file = System.IO.File.ReadAllBytes(@”C:\Users\User\Documents\Visual Studio 2017\Projects\VS2017Test\VS2017Test\Controllers\HomeController.cs“); |
|
|
|
return File(file, “text/plain“, “HomeController.cs“); |
|
} |
|
|
|
//returns the file content as an array of bytes |
|
public FileContentResult FileContentActionResult() |
|
{ |
|
var file = System.IO.File.ReadAllBytes(@”C:\Users\User\Documents\Visual Studio 2017\Projects\VS2017Test\VS2017Test\Controllers\HomeController.cs“); |
|
|
|
return File(file, “text/plain“, “HomeController.cs“); |
|
} |
|
|
|
//return the file as a stream |
|
public FileStreamResult FileStreamActionResult() |
|
{ |
|
//var file = System.IO.File.ReadAllBytes(@”C:\Users\User\Documents\Visual Studio 2017\Projects\VS2017Test\VS2017Test\Controllers\HomeController.cs”); |
|
//var stream = new MemoryStream(file, writable:true); |
|
|
|
var fileStream = new FileStream(@”C:\Users\User\Documents\Visual Studio 2017\Projects\VS2017Test\VS2017Test\Controllers\HomeController.cs“, FileMode.Open, FileAccess.Read); |
|
|
|
return File(fileStream, “text/plain“, “HomeController.cs“); |
|
} |
|
|
|
//returns a file specified with a virtual path |
|
public VirtualFileResult VirtualFileActionResult() |
|
{ |
|
return File(“/css/site.css“, “text/plain“, “site.css“); |
|
} |
|
|
|
//returns the specified file on disk, that is it’s physical address |
|
public PhysicalFileResult PhysicalFileActionResult() |
|
{ |
|
return PhysicalFile(@”C:\Users\User\Documents\Visual Studio 2017\Projects\VS2017Test\VS2017Test\Controllers\HomeController.cs“, “text/plain“, “HomeController.cs“); |
|
} |
FileResult
FileResult is the parent of all file related action results. These are: FileContentResult, FileStreamResult, VirtualFileResult, PhysicalFileResult. Since we can use it to return any kind of file, we can use it when we need flexibility for example if we need to return files from different places in the system based on the parameters we receive, kind of like IActionResult. There is a method on ControllerBase class called File. This method accept a set of parameters based on the type of file and its location, which maps directly to the more specific return types mentioned above, I’ll discuss how to use it in the following section.
FileContentResult
Use FileContentResult if you want to return the file as an array of bytes as you see in FileContentActionResult.
FileStreamResult
We use FileStreamResult when we want to return the file as a FileStream as you can see in FileStreamActionResult.
VirtualFileResult
You can use VirtualFileResult if you want to read a file form a virtual address and return it, as shown in the VirtualFileActionResult .
PhysicalFileResult
You can use PhysicalFileResult to read a file from a physical address and return it, as shown in PhysicalFileActionResult method.
Action results form previous version of Asp.Net MVC that are either reamed or deleted
JavaScriptResult (doesn’t exist anymore, you can use ContentResult instead)
FilePathResult (Use VirtualFileResult or PhysicalFileResult insead)
HttpNotFoundResult (Use NotFoundResult instead)
HttpStatusCodeResult (Use StatusCodeResult instead)
HttpUnauthorizedResult (Use UnauthorizedResult instead)
If you know of any other changed or deleted action results, please let me know in the comments section.
Building and returning a custom result
|
using System.IO; |
|
using System.Text; |
|
using System.Threading.Tasks; |
|
using Microsoft.AspNetCore.Mvc; |
|
using System.Xml.Serialization; |
|
using Microsoft.AspNetCore.Mvc.Internal; |
|
|
|
namespace VS2017Test.Controllers |
|
{ |
|
public class XmlResult : ActionResult |
|
{ |
|
/// <summary>Gets or sets the HTTP status code.</summary> |
|
public int? StatusCode { get; set; } |
|
|
|
/// <summary>Gets or sets the value to be formatted.</summary> |
|
public object Value { get; set; } |
|
|
|
/// <summary> |
|
/// Creates a new <see cref=“T:Microsoft.AspNetCore.Mvc.JsonResult“ /> with the given <paramref name=“value“ />. |
|
/// </summary> |
|
/// <param name=“value“>The value to format as JSON.</param> |
|
public XmlResult(object value) |
|
{ |
|
this.Value = value; |
|
} |
|
|
|
public XmlResult(object value, int? statusCode) |
|
{ |
|
this.Value = value; |
|
this.StatusCode = statusCode; |
|
} |
|
|
|
private string Serialize<T>(T value) |
|
{ |
|
if (value == null) |
|
{ |
|
return string.Empty; |
|
} |
|
|
|
var type = value.GetType(); |
|
XmlSerializer serializer = new XmlSerializer(type); |
|
|
|
using (StringWriter writer = new StringWriter()) |
|
{ |
|
serializer.Serialize(writer, value); |
|
return writer.ToString(); |
|
} |
|
} |
|
|
|
/// <inheritdoc /> |
|
public override Task ExecuteResultAsync(ActionContext context) |
|
{ |
|
var response = context.HttpContext.Response; |
|
response.ContentType = “application/xml“; |
|
response.StatusCode = StatusCode ?? 200; |
|
var xmlBytes = Encoding.ASCII.GetBytes(Serialize(Value)); |
|
context.HttpContext.Response.Body.WriteAsync(xmlBytes, 0, xmlBytes.Length); |
|
return TaskCache.CompletedTask; |
|
} |
|
} |
|
} |
If the current preexisting action results doesn’t meet your requirement, you can create your own. First let me tell you that if you need an action result that returns XML, you don’t need a custom action result. You can use input and output formatter explained near the bottom of this page. The reason for explaining this is to see how asp.net core produce response and the fact that we can customize it however we want.
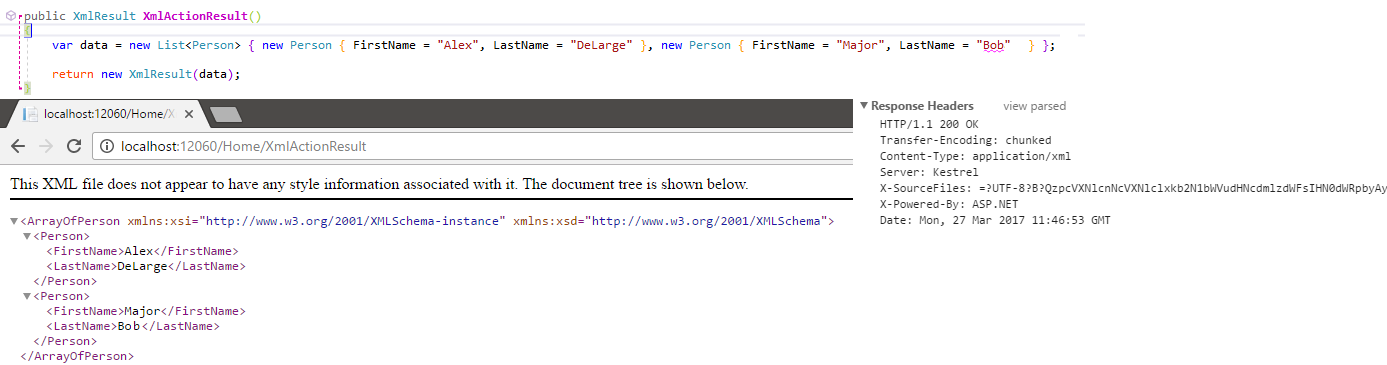
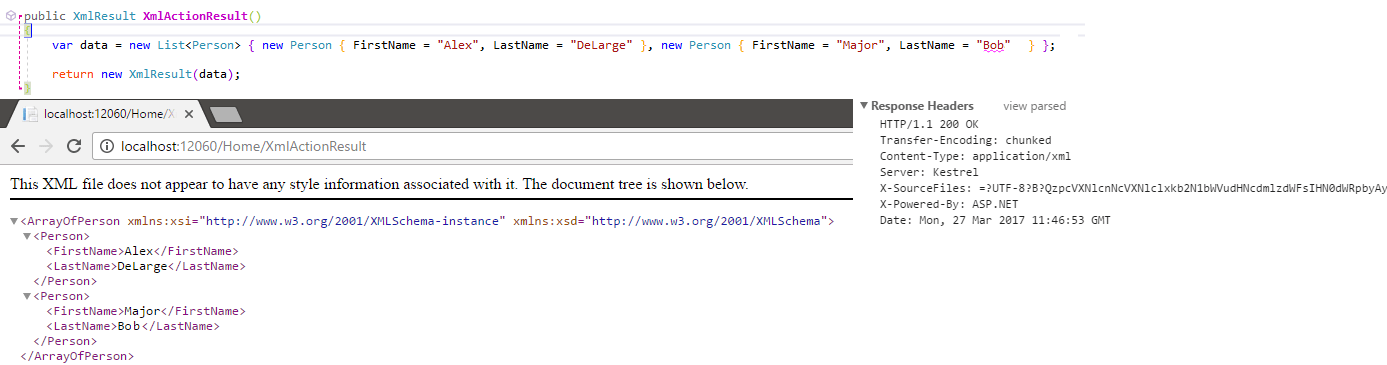
In order to build a custom action result, we need to inherit form IActionresult or ActionResult. I have two constructor function, one only get the value to be serialized and other one get the value and the status code. Next I override the method ExecuteResultAsync and assigned the HttpResponse object to a variable, then I set the ContentType and StatusCode value. Finally I’ve serialized the value using Serialize private method, converted that serialized value to an array of byte, and wrote that to response body using context.HttpContext.Response.Body.WriteAsync. Here is what we get when we use it:
As I’ve said you don’t need to do this if you need to format a value to another type, there are Input formatters that are used with model binding, and output formatters that are responsible for formatting responses.
Best practices regarding the use of action results
I’m a proponent of being as specific as possible and not using IActionResult and ActionResult unless you really need flexibility, here is my reasons for doing so:
- programmers can mistakenly return an action result type that are not pertinent and usable by the caller, take a look at this image:

As you can see, when we are specific we immediately get a build error, but with IActionResult we don’t get anything. Let’s try to use the result with IActionResult to see what happens:

As you can see we can’t use the NotFoundResult that is returned. What I mean is that we cannot react to this kind of result, any code I put here isn’t going to run. You might say who will do such a thing? But I see this a lot, often an action result type are returned that are incompatible with the way this action is going to be used.
- Another reason is that by returning an specific kind of action result our controller becomes more clear. If we have 20 action in our controller, and four of them are JsonResults for example, the return type singles them out
- Another minor reason is when we unit test the controller’s action, we don’t need to cast the results all the time, this is a small reason, but it’s still a reason 😉
I’m not saying we shouldn’t use IActionResult, I say we use it when we need it, not because we don’t know what type of result we should return or using IActionResult make our life simpler.
Summary
In this post I described all the action results available in Asp.Net Core and categorized them based on usability. I also described what happens under the hood when we return an action result and introduced some ideas about when and how to use them. You can find the code files used in this post here.